

Quick Summary
To build a workbench, cut 2x4 lumber into legs and rails, assemble two leg frames with glue and screws, connect them with top rails, add braces, and screw a 3/4-inch plywood top to the frame. A basic bench of this kind takes roughly two hours of actual work for a beginner.
- Set the bench height by measuring from the floor to your bent elbow, not a standard number.
- Use a 48 by 24 inch plywood top on a 2x4 frame for a 4-foot by 2-foot bench.
- Buy 10 to 12 percent extra lumber to cover knots, warp and cutting mistakes.
- Check diagonal measurements on each frame so the bench stays square.
- Push the finished bench sideways and front-to-back to confirm it does not wobble.
Table of Contents
- What You Need Before You Start Building a Workbench
- DIY Workbench Plans: Choosing a Design and Intended Use
- Workbench Dimensions and Height: Sizing the Bench to You
- Workbench Materials and Tools: Lumber, Fasteners and a Cut List
- Step-by-Step: Building the Legs, Rails and Top
- Planning a Two-Hour DIY Workbench Build
- Booking Your First Power Tools for the Build
- Frequently Asked Questions
What You Need Before You Start Building a Workbench
Last Updated: October 30, 2026
Learning how to build a workbench is one of the best first projects for a home workshop. A sturdy bench gives you a flat surface for cutting, drilling and assembling everything else you make.
A beginner workbench needs a flat top, a solid base, and a few basic tools. No advanced skills required, just a clear plan, accurate measurements, and a few safety habits.
Beginner skills you need and tool alternatives
You only need a handful of skills to build a basic workbench: measuring and marking a straight line, cutting lumber to length, and driving screws square and tight.
If you do not own every tool yet, these alternatives work well:
- Circular saw instead of a miter saw: Clamp a straight guide board to mark square cuts.
- Hand saw instead of a power saw: Slower, but it works for 2x4 lumber.
- Drill with driver bits instead of an impact driver: Pre-drill pilot holes to keep the wood from splitting.
Watch out: Wood that is not straight will make the whole bench wobble. Sight along each board before you cut it.
DIY Workbench Plans: Choosing a Design and Intended Use
Before you buy anything, decide what the bench is for, because to build a workbench that suits your work you need to know its purpose.
Most free plans fall into three styles: a simple framed bench, a bench with a shelf below, and a bench with drawers. The framed bench is easiest for beginners, fewer parts and cuts mean mistakes are cheaper to fix.
Ask yourself a few questions before you pick a plan:
- What kind of projects will I do most?
- How much weight will sit on the top?
- Do I need storage underneath?
A plan that matches your answers saves time and money. A printable plan is often the quickest start, as long as you check its measurements against your space.
Workbench Dimensions and Height: Sizing the Bench to You
Size matters more than most beginners expect. A bench that is too low strains your back. One that is too high makes fine work hard.
A common starting point is a top about 24 to 30 inches deep and 4 to 6 feet long, with height between 34 and 38 inches. To find your ideal height, stand straight, bend your arms to 90 degrees, and measure from the floor to your elbow.
Keep these sizing tips in mind:
- Depth: Deep enough for your largest project, but not so deep you cannot reach the back.
- Length: Longer benches hold more work, but they need more room and more lumber.
- Height: Measure your own body, not a standard number from a plan.
Build for the person who uses the bench most, and add a few inches if a taller household member will share it.
Workbench Materials and Tools: Lumber, Fasteners and a Cut List
Good materials keep the bench flat and strong. Most beginner benches use 2x4s for the frame with a thicker board or plywood for the top. Writing a complete, itemized takeoff before you leave for the store makes the build run more smoothly.
A real cut list for a 4-foot by 2-foot bench
This is a common beginner-friendly size that fits most garage or spare-room footprints. All pieces are 2x4 unless noted. Adjust lengths to your own space, but keep the proportions.
- Legs: 4 pieces at 34 inches (cut to your measured elbow height minus the top thickness)
- Top rails (long sides): 2 pieces at 48 inches
- Top rails (short sides): 2 pieces at 21 inches
That is roughly 11 pieces of 2x4 plus the top. A standard 8-foot 2x4 yields two 48-inch pieces or two 34-inch legs with waste, so plan your cuts on paper before you buy.
Itemized shopping list with waste allowance
Buy 10 to 12 percent extra lumber to cover knots, warp, and cutting mistakes. For this bench, that means:
- 2x4 lumber: 9 to 10 boards at 8 feet
- Top material: one 4x8 sheet of 3/4-inch plywood or three 2x6 boards if you prefer solid wood
- Exterior wood screws, 2.5 to 3 inches: one 1-pound box
Check current prices at your local building-supply store before you commit.
Fasteners and joinery choices for beginners
You do not need advanced joinery to build a rigid bench. The three beginner-friendly options are:
- Wood screws with pilot holes: The simplest and cheapest. Pre-drill to prevent splitting, especially near board ends. Use exterior-rated screws so they resist rust in a garage.
- Carriage bolts: Stronger for the leg-to-rail connections. Drill a through-hole, insert the bolt, and tighten a washer and nut on the other side. They resist loosening better than screws under heavy use.
- Glue plus screws: The strongest simple joint. Spread wood glue on the mating faces, clamp, then drive screws while the glue is wet. The glue does most of the work once cured.
A common pattern is glue and screws for the leg assemblies and carriage bolts for the top rails, where the bench takes the most racking force.
Tools you actually need
For tools, a drill with a driver bit is the core of this build. The DEWALT 20V MAX* Cordless Drill and Impact Driver, Power Tool Combo Kit - Refurbished with Dewalt Warranty - DCK277C2 is available from Home Essentials Outlet for $189.99 CAD.
DEWALT 20V MAX* Cordless Drill and Impact Driver, Power Tool Combo Kit →

To keep your bits and fasteners organized while you work, a storage box helps a lot.
For sanding the top smooth, the DEWALT DWE6411K Palm Sander, 1/4 Sheet - Refurbished with Dewalt Warranty is available from Home Essentials Outlet for $69.98 CAD.

Watch out: Do not use interior-only screws for a bench that will see moisture or heavy use. Exterior-rated fasteners resist rust and hold better over time.
The table below summarises the fastener and joinery options the article recommends for a beginner workbench.
| Option | Best for | Key difference |
|---|---|---|
| Wood screws with pilot holes | Simplest, cheapest builds | Pre-drill to prevent splitting; use exterior-rated screws |
| Carriage bolts | Leg-to-rail connections | Resist loosening better under heavy use |
| Glue plus screws | Strongest simple joints | Glue does most of the work once cured |
Step-by-Step: Building the Legs, Rails and Top
Work in order: legs first, then rails, then the top.
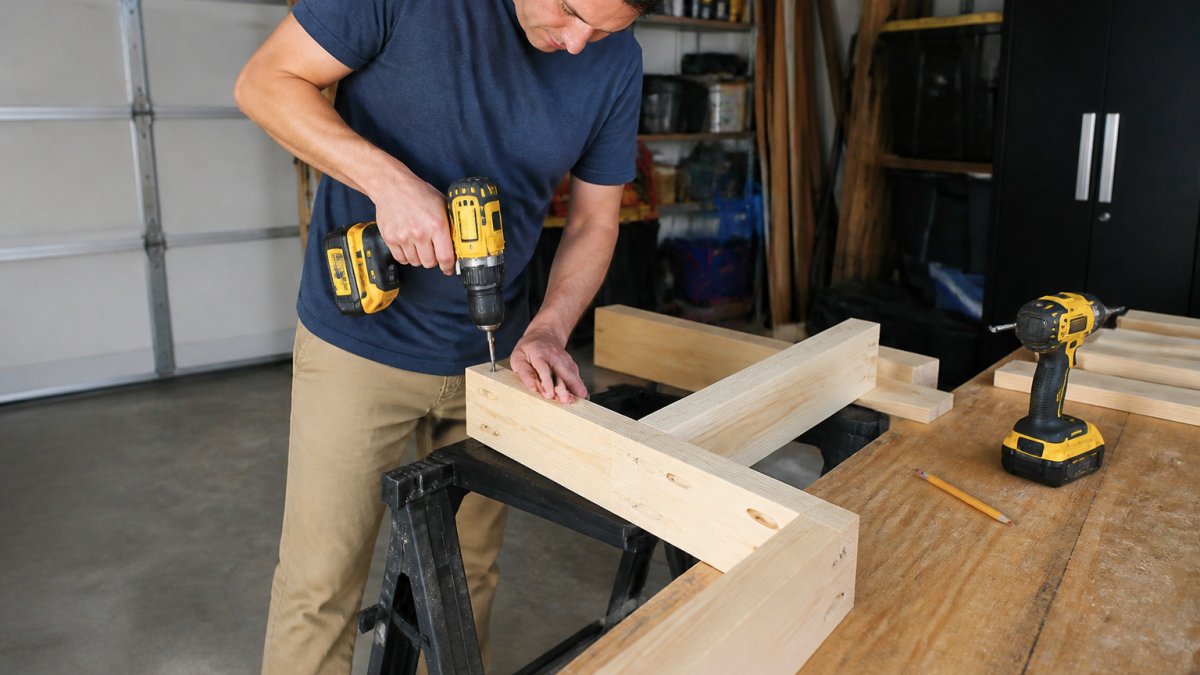
Step 1: Cut your pieces. Cut all lumber to the lengths on your cut list. Organizing your workspace in this manner establishes a disciplined habit that proves invaluable when you eventually move on to installing cabinets in your home shop.
Step 3: Attach the top rails. Stand the two leg assemblies upright and connect them with the 48-inch long rails along the top. This is where carriage bolts earn their keep, drill through the leg and rail, insert the bolt, and tighten a washer and nut. Keep the top edges of the rails level with each other so the surface sits flat.
Step 4: Add supports. Install the lower shelf rails and cross braces to stop the frame from racking side to side.
Step 5: Fasten the top. Place the top on the frame and screw it down from underneath with 1.5- to 2-inch screws.
Step 6: Sand and check. Sand sharp edges and any rough spots.
Fastening order that prevents problems
Drive screws in a sequence that pulls the frame together rather than pushing it apart. Start with the joints closest to the center, then work outward. When attaching the top, start at one corner and move diagonally so the wood settles without trapping a twist.
Troubleshooting: fixing wobble, twist and out-of-square tops
Even careful builders hit these problems. Here is how to fix the common ones:
- Bench rocks on the floor: One leg is slightly long. Mark the high leg, then sand or plane a small amount off the bottom. Recheck on the floor before and after each pass.
- Frame is twisted: Loosen the top rails slightly, rack the frame until the diagonal measurements match, then retighten. A twisted frame usually comes from tightening one side before the other.
- Top is out of square: If the top overhangs unevenly, loosen the top screws, shift the top until the overhang is even on all sides, then redrive the screws.
Safety tips for first-time builders
Safety is the part beginners most often skip. A few habits prevent most injuries:
- Wear safety glasses whenever you cut, drill or sand.
- Clamp boards before cutting or drilling. Never hold them by hand.
- Unplug or switch off tools before changing bits or blades (CCOHS: Powered Hand Tools - Electric Tools).
Good lighting also matters. A well-lit garage lets you see the cut line clearly. Keep the floor clear of offcuts so you do not trip.
Common mistakes at this stage include skipping the square check and driving screws too close to the edge of the wood. Both lead to a bench that looks fine at first and loosens over time.
Planning a Two-Hour DIY Workbench Build
A simple bench can come together in about two hours of actual work, once you have the materials. Plan the time like this:
- First 20 minutes: Check your cut list and lay out all the pieces.
- Next 40 minutes: Cut all lumber and label it.
- Next 40 minutes: Assemble the legs and rails.
Expect the first build to take longer. Your second bench will go faster. Give yourself a buffer, especially if you are learning to use the drill and saw for the first time.
Many beginners find this a good weekend project. Break it up if you need to. Glue and screws can rest overnight without any problem.
Booking Your First Power Tools for the Build
If you are buying tools for this project, start with the essentials: a drill, a driver, a sander and a storage box. Buy one good tool, use it, then add the next one when you need it.
Home Essentials Outlet offers refurbished DEWALT power tools backed by a 6-month DEWALT warranty. Learn which drills, saws, and kits matter most on a budget before you buy. See the drill and impact driver combo kit for details on what it includes.
Frequently Asked Questions
What is the easiest workbench to build for a beginner?
A basic frame workbench with a 2x4 base, a plywood or lumber top and no drawers is the easiest first project. It uses straight cuts, screws instead of joinery, and only a handful of tools. Keep the top at about 60 to 90 cm wide and the height near your hip height so you can stand comfortably while working. Once this simple design is finished and stable, you can add shelves or drawers in a later project.
How tall should a workbench be?
Most people build a workbench between 85 and 95 cm tall, which suits a standing adult. To set your own height, stand with your arms relaxed at your sides and measure from the floor to your wrist, then adjust the leg length to match. Working at this height reduces back strain during planing, sawing and assembly. If you do a lot of detailed work, a slightly taller bench can help you see the work more clearly.
What tools do I need to build a workbench?
The core tools are a tape measure, a speed square, a circular saw or hand saw, a drill and driver bit set, and a level. A clamp or two makes assembly much easier. You can substitute a hand saw for a circular saw and a manual screwdriver for a drill, although a cordless drill such as the DEWALT 20V MAX Cordless Drill and Impact Driver Combo Kit (refurbished, $189.99 at Home Essentials Outlet, backed by a 6-month DEWALT warranty) will save considerable time on the fasteners.
How long does it take to build a simple workbench?
A simple frame workbench with pre-cut lumber can be assembled in about two hours by a beginner. Cutting the lumber from raw stock, sanding and finishing can add several more hours. Plan for a full weekend if you are working alone or learning as you go. Allow extra time for the first build, because measuring and checking square take longer until you develop a routine.


